
You don’t need to be a professional photographer or videographer to create awesome visual content on Apple smartphones. Just point the camera, take a photo or video, and you’re done. But if you’re aiming for something more, you can tweak some settings. Not all of them are obvious or well-known, so we’ve decided to share how to adjust the camera on an iPhone, whether it’s an 11 or a 15 Pro Max.
Always Clean the Camera Lens
The most basic action that people often forget about: Before taking a photo or video, always wipe your camera lens to remove any fingerprints. It doesn’t matter what you use—a tissue or the corner of your shirt—the result is the same. Make it a habit, and your photos will be vibrant and sharp, even without additional adjustments.
Manually Adjust Focus/Exposure for Super-Crisp Images
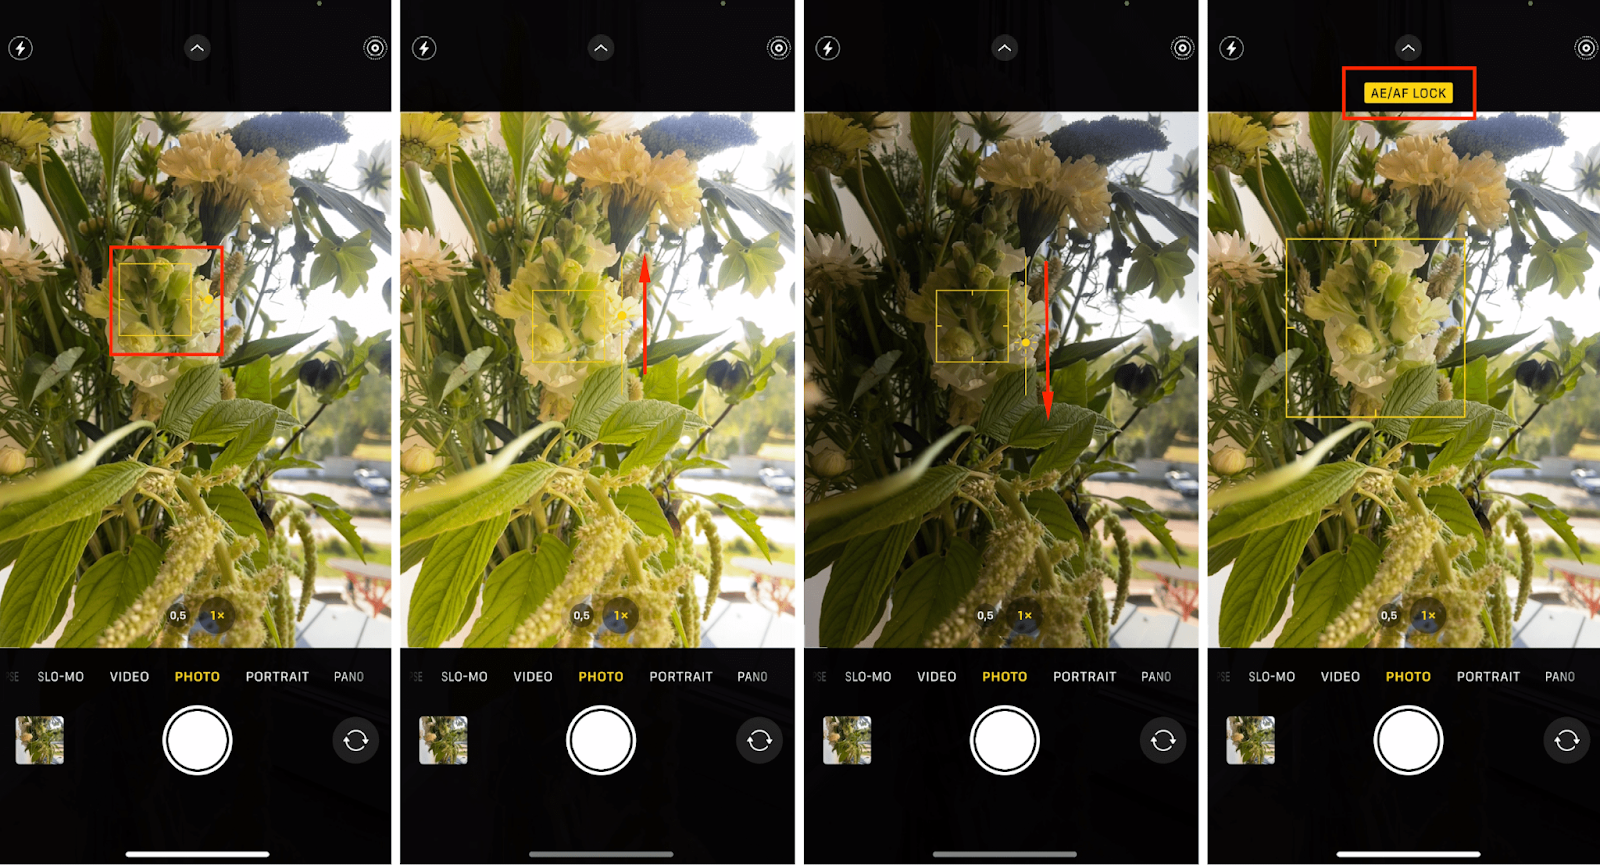
Auto-focus doesn’t always capture what you want. To fix this and improve photo quality on your iPhone, tap on the specific object on the screen that you want to highlight. If it moves, keep following it with your finger to ensure focus doesn’t shift.
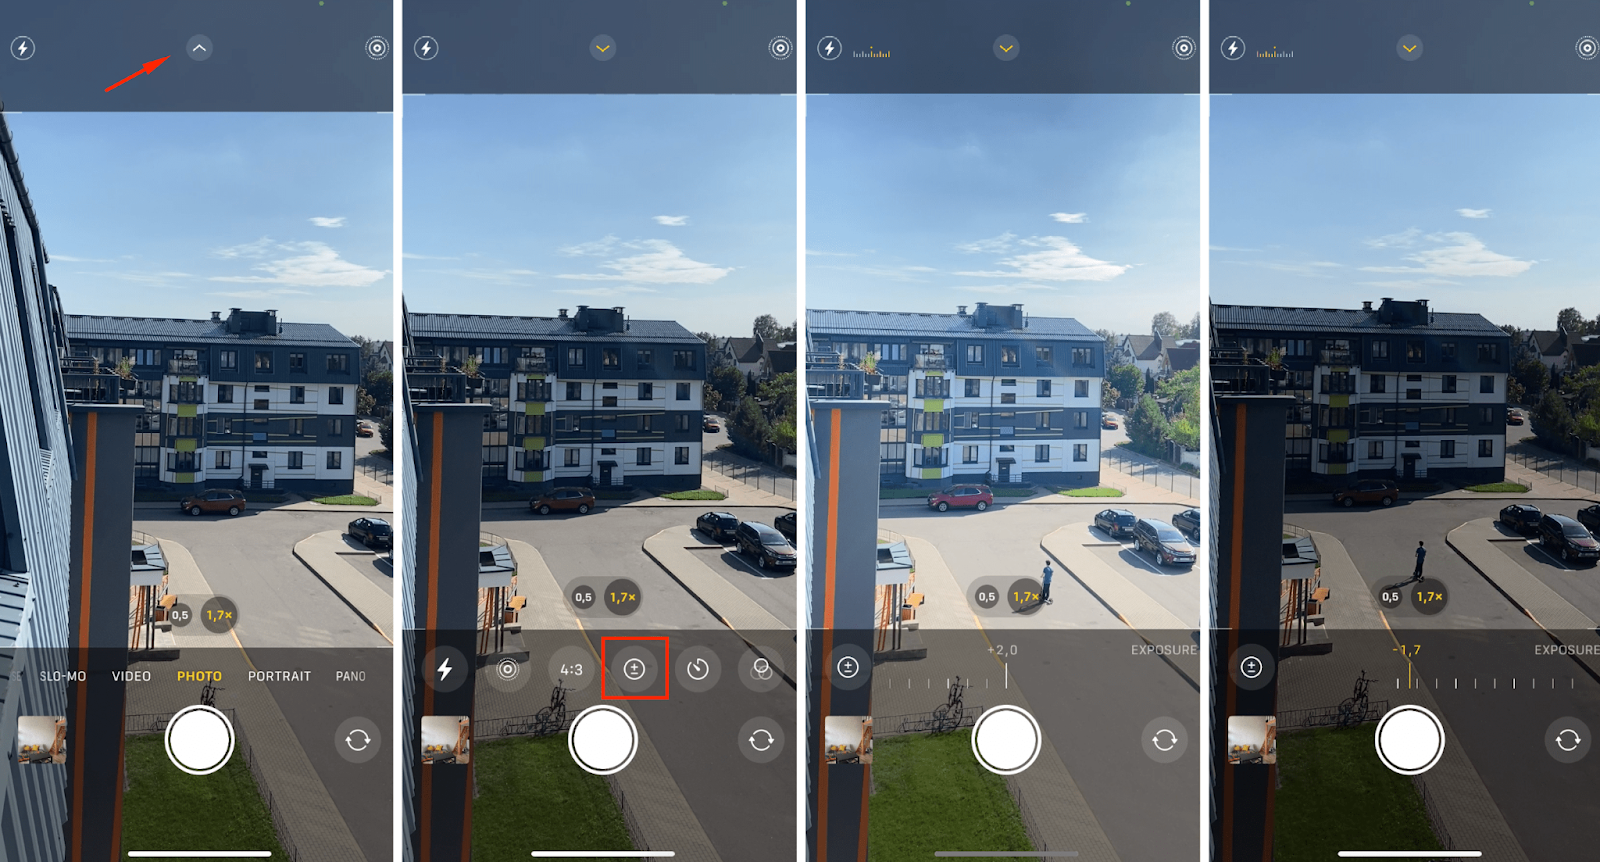
Exposure is equally simple. This setting controls the light balance in the frame, and iPhone usually handles it well. But in challenging lighting conditions, you may need to adjust it. For example, if you’re shooting against the sun and want to highlight the sky while keeping the person in the frame dark, or if you want to darken the image—a trendy style now. To adjust exposure manually, tap on an object in the frame and drag the sun icon (next to the focus area) up or down. Just be sure to avoid overexposure or overly dark spots.
Good to Know: If you’re taking a series of photos in one location and don’t want to adjust the settings each time, simply lock the manually set adjustments. It’s easy: Tap and hold the focus area until you see “AE/AF Lock” (Auto Exposure/Auto Focus Lock). To unlock, just tap the screen again.
How to Set Camera on iPhone 11 (or Any Other) to Lock Exposure for Long-Term Use?
Press the circle with the arrow, then the circle with the “+” and “–,” move the slider to adjust the exposure, and the settings will be saved, even if you close the app and reopen it later.
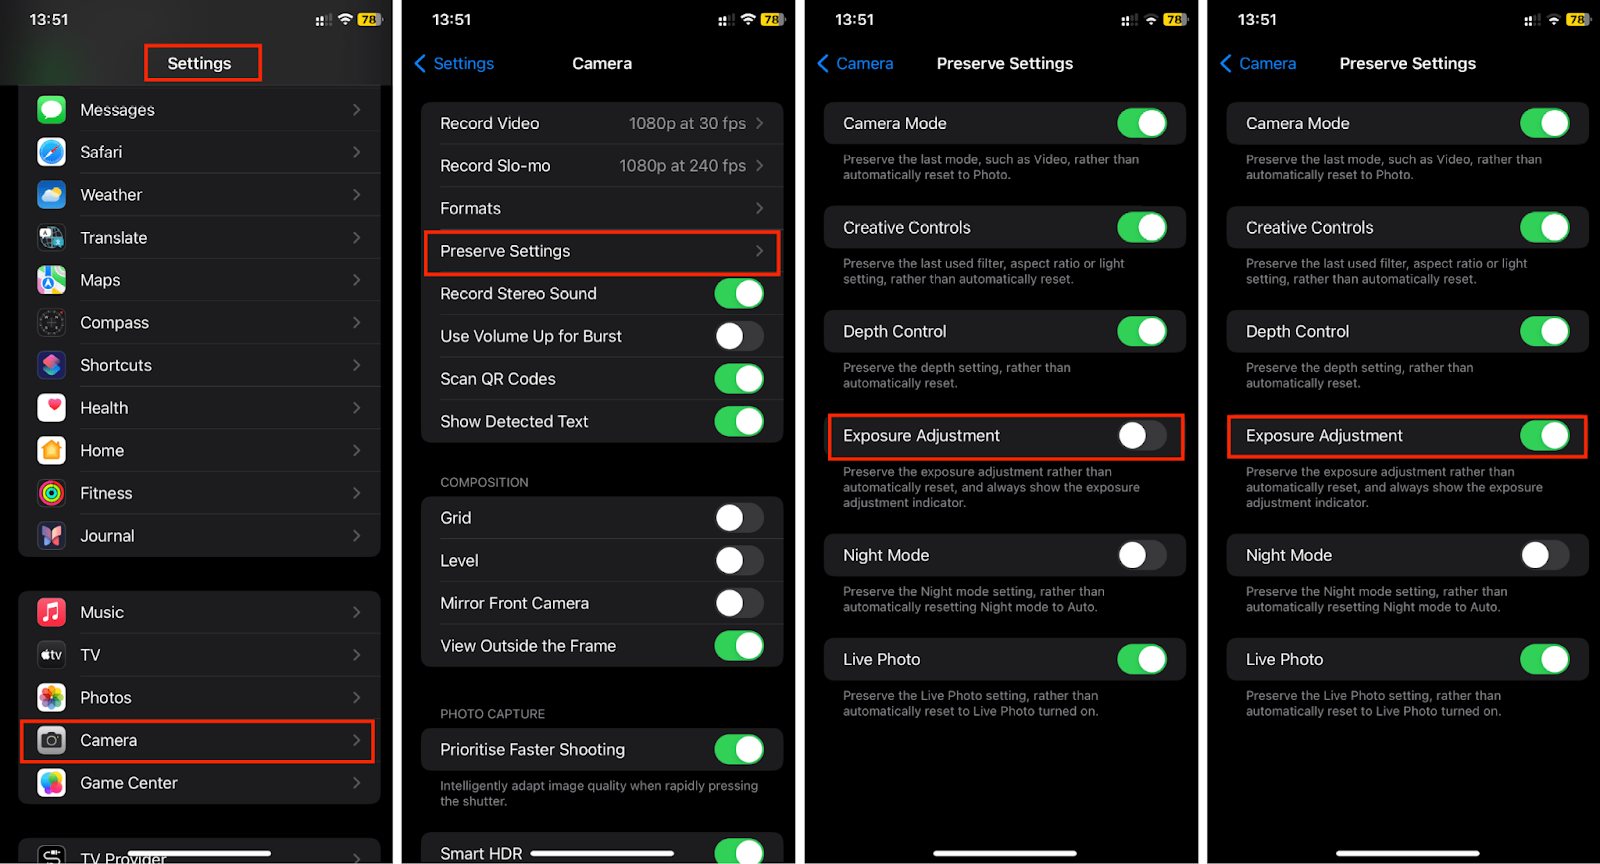
There’s also a second way to save your camera settings after closing the app—through the phone’s settings:
· Go to the “Camera” section.
· Select “Preserve Settings” and activate the “Exposure Adjustment” option (it will turn green).
Turn On the Grid to Avoid a Crooked Horizon
When taking quick photos, you might end up with a tilted horizon or your main subject not where you want it. The grid can help fix that—it divides the screen into nine equal parts, making it easier to place your subject (rule of thirds—position your subject along the lines or intersections). A level tool helps ensure the horizon is straight.
Activate these functions: On your iPhone, go to “Settings” > “Camera” and toggle the switches for “Grid” and “Level.” Voila—perfect horizon every time!

Choose ProRAW or ProRes Mode
Want to shoot amazing videos or photos but only have your smartphone? You can still get great results by adjusting the resolution. Here’s how to enhance the quality of photos and videos on iPhone.
For Photos
Starting with the iPhone 12 Pro series, Apple smartphones can save photos in ProRAW format, similar to the RAW format on professional cameras. These files are much larger (50–80 MB), so they fill up storage quickly. But they are a lifesaver when you need high-quality images.
On all iPhone 15 models, the default resolution is 24 MP. To change it to ProRAW, go to “Settings” > “Camera” > “Formats” and enable “Resolution Control” or “ProRAW and Resolution Control.”
In Pro mode. On iPhone 15 Pro and iPhone 15 Pro Max, after enabling the option, you can select “Default (Pro Shooting)” and choose one of the suggested options.

You can turn on/off the selected format through the Camera app by tapping the toggle at the top of the screen. Hold the toggle to change the format.
Important: In the gallery, such photos look like regular ones, but you can upload them to post-processing apps like Lightroom, ON1 Photo RAW for Mobile, Snapseed, VSCO, or Photoshop (via PC) to edit them.
For Videos
iPhone 13 Pro and newer Pro models support ProRes format, which contains more color and detail data. These videos are also much larger. By default, this mode is off, but you can activate it: “Settings” > “Camera” > “Formats” > “Apple ProRes.” Then open the Camera app, switch to video mode, and tap the ProRes icon.
Set Frame Rate for Video Shooting
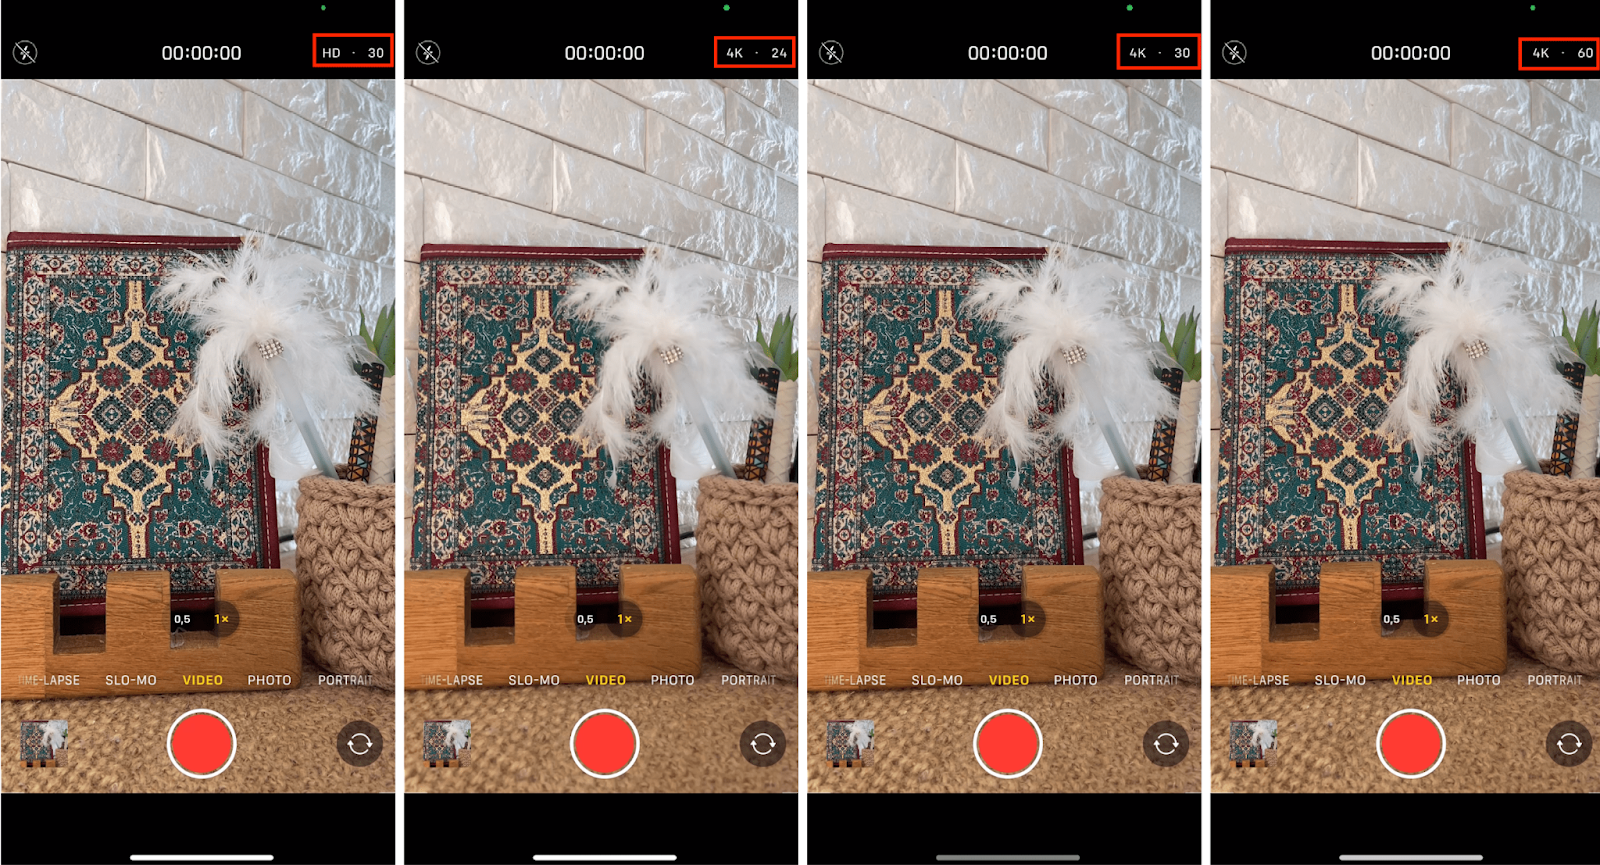
In iPhones, starting with the 11 series, the “Video” mode offers quick switches at the top of the screen for easier camera setup—switching between HD and 4K or adjusting the frame rate—24, 25, 30, or 60 (options depend on the model).
On the 14th and 15th models, this option is also available in “Cinematic Mode,” with added quick switches.
For example, in low light, 24 frames per second improves video quality (default is 30 fps). You can also select the temperature mode—warm or cool tones—to save editing time. And if you’re shooting Instagram stories often, set the 9:16 aspect ratio upfront to avoid stretching the image later.
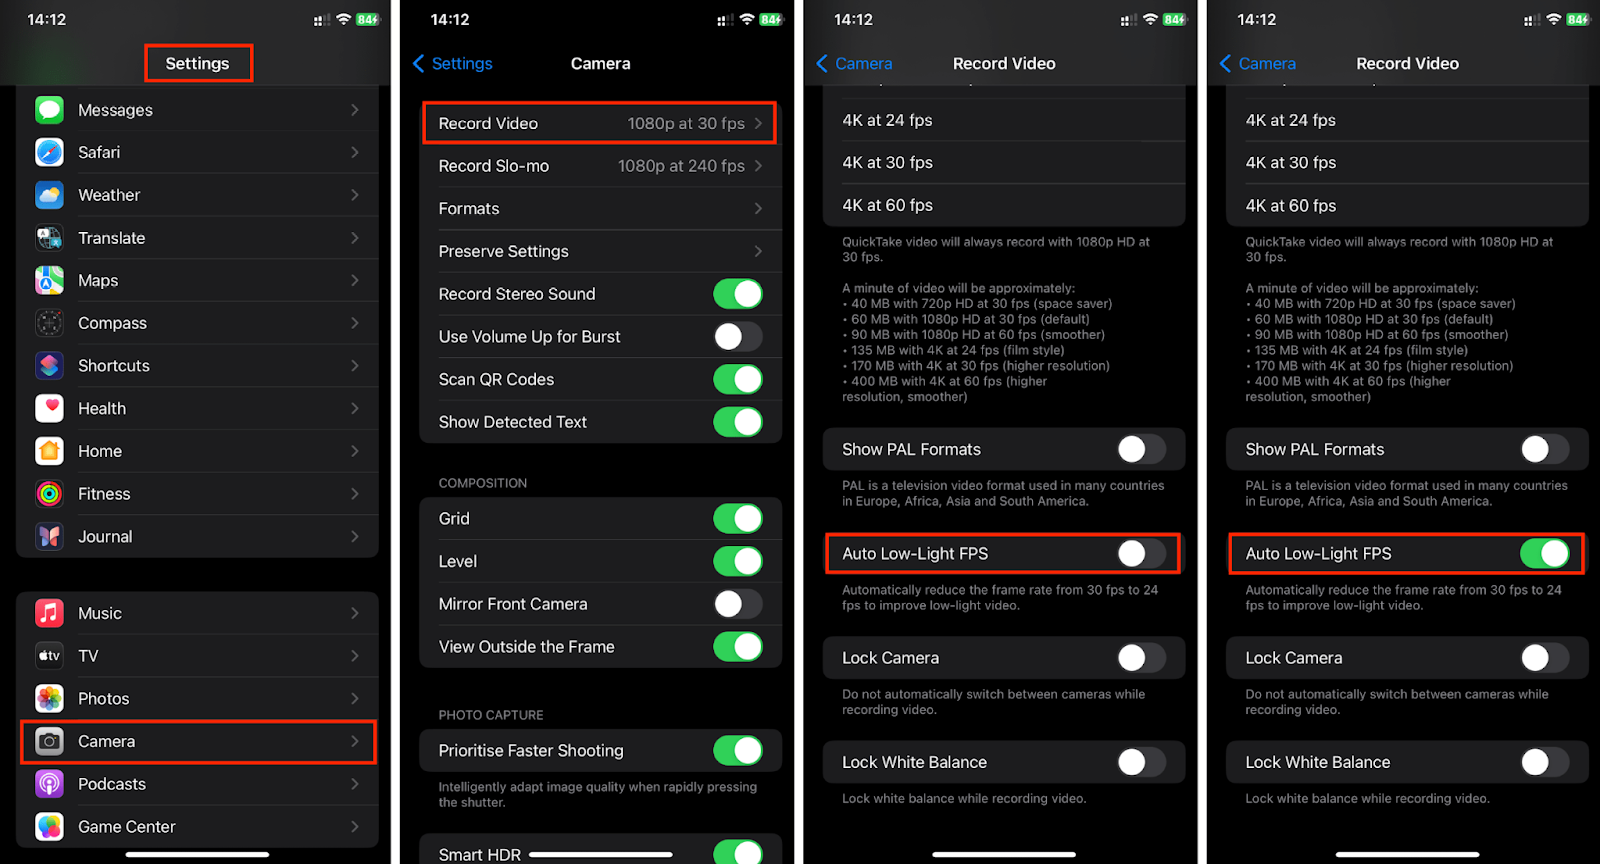
So, if the lighting is bad, but you need good shots, go to “Settings” > “Camera” > “Record Video” and select “Auto FPS.” The system will automatically adjust between 30 and 60 frames per second. Alternatively, activate the “Auto Low Light FPS” option.
Hands-Free Selfies Without Shaky Shots
Here’s how to set up your iPhone’s main or front camera if you want to take selfies hands-free and from a distance.
Turn on the timer:
· Open the camera and tap the arrow in the circle to access settings.
· Tap the clock icon and choose either “3s” or “10s.”
· Press the shutter button and run to your spot.
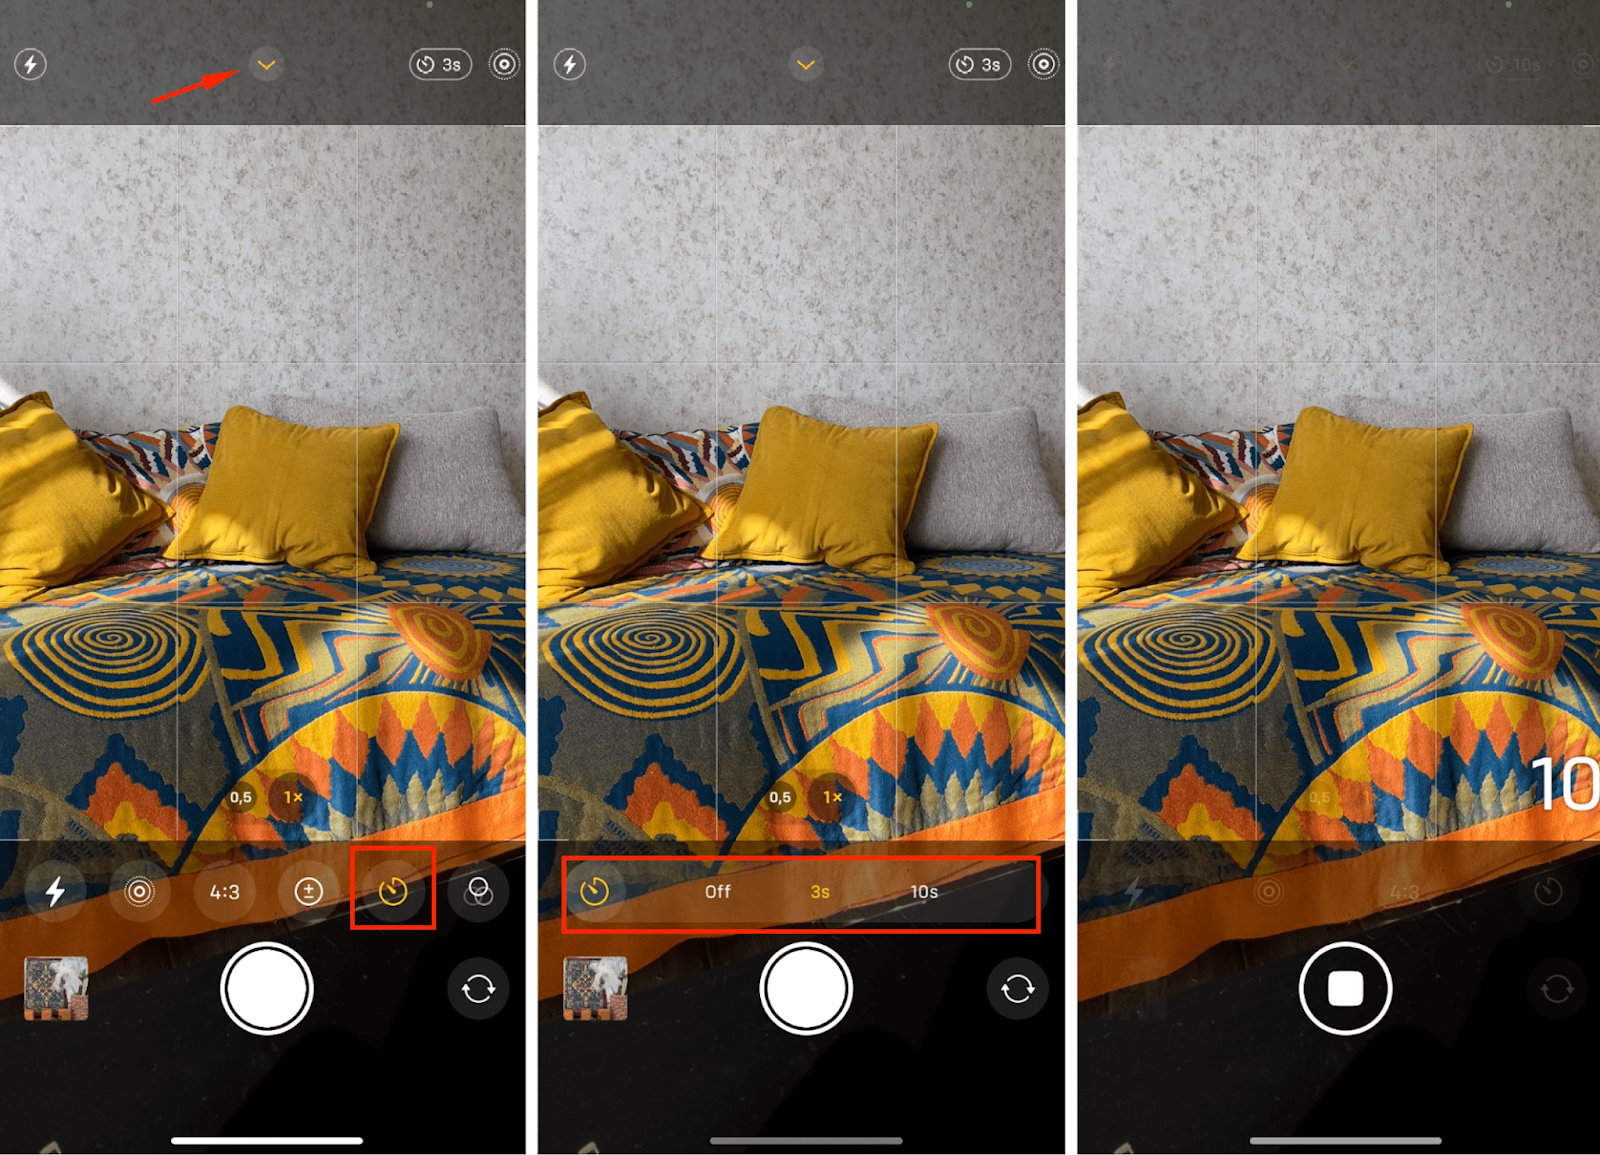
The timer also helps reduce shake during shooting, especially if you’re in an awkward pose or zoomed in.
Manually Adjust the Flash
Recent iPhone models have a night mode that performs well in low light, so the flash isn’t always necessary. If needed, it’s best to turn it on just before shooting. Tap the lightning icon (on/off option) or tap the circle with the arrow, then the lightning, and select “Auto,” “On,” or “Off.”

Warm Up or Cool Down Your Shots with Filters
Another way to improve your photo quality is by using built-in filters like those in Instagram. This is especially useful for creating black-and-white photo series. You can see the shot without color and adjust the composition or add details. It’s simple:
· Open the camera and choose “Photo” or “Portrait” mode.
· Tap the circle with the arrow and the three-ring button.
· Swipe the filter list left or right to see the results.
· Tap the shutter button to take a photo with the chosen filter.
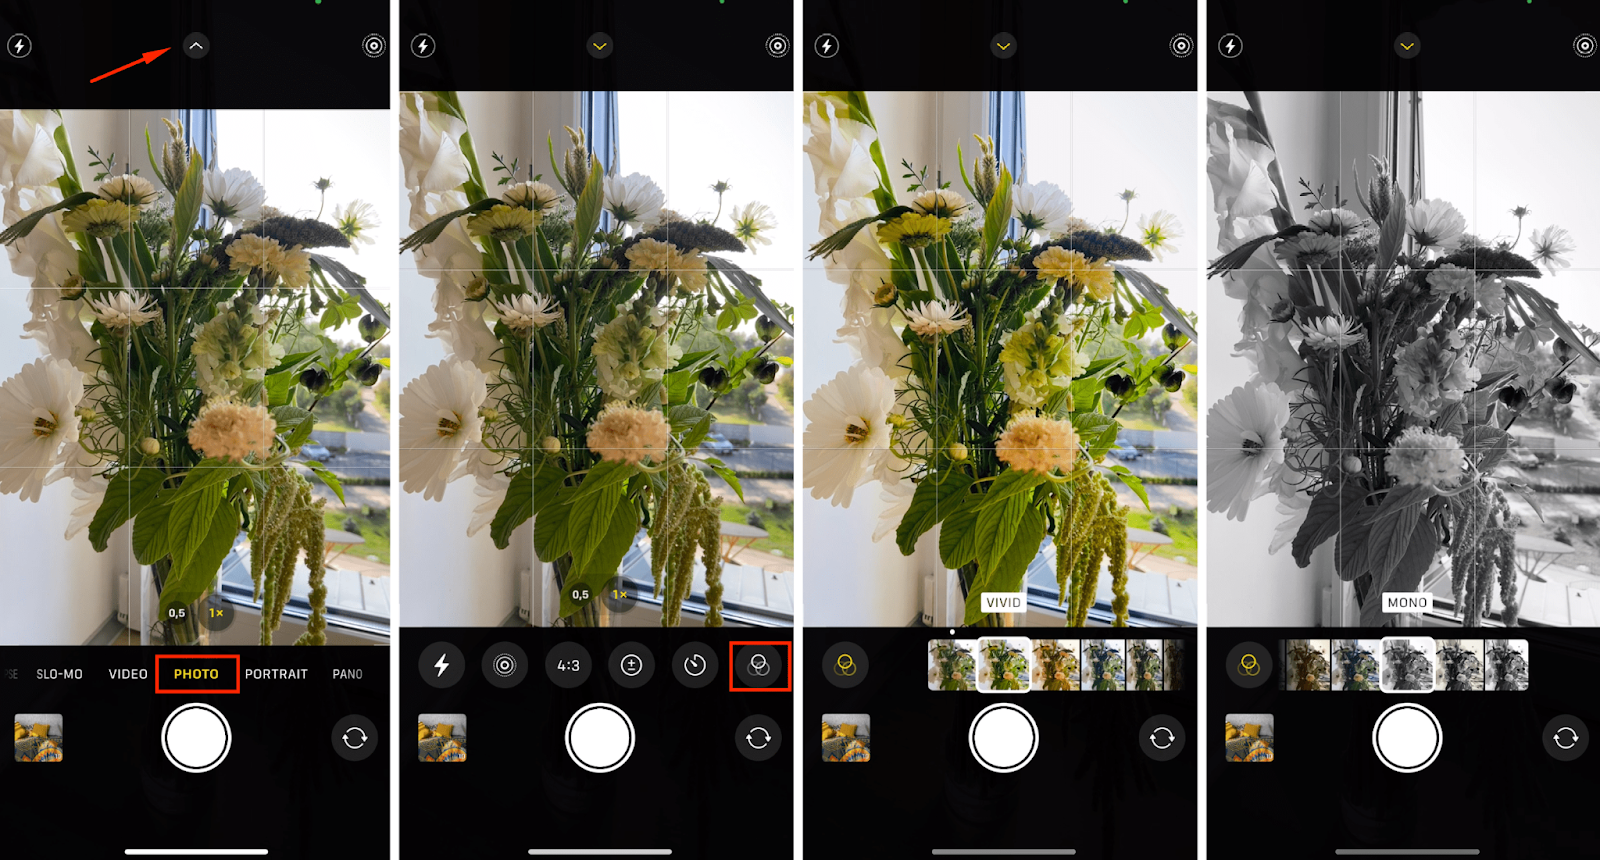
The iPhone 13 series and newer models also support photographic styles—pre-set color adjustments. You can remove yellow tones or make your shots warmer, as well as increase saturation or contrast. The photographic styles icon is located in the same place as the filters.
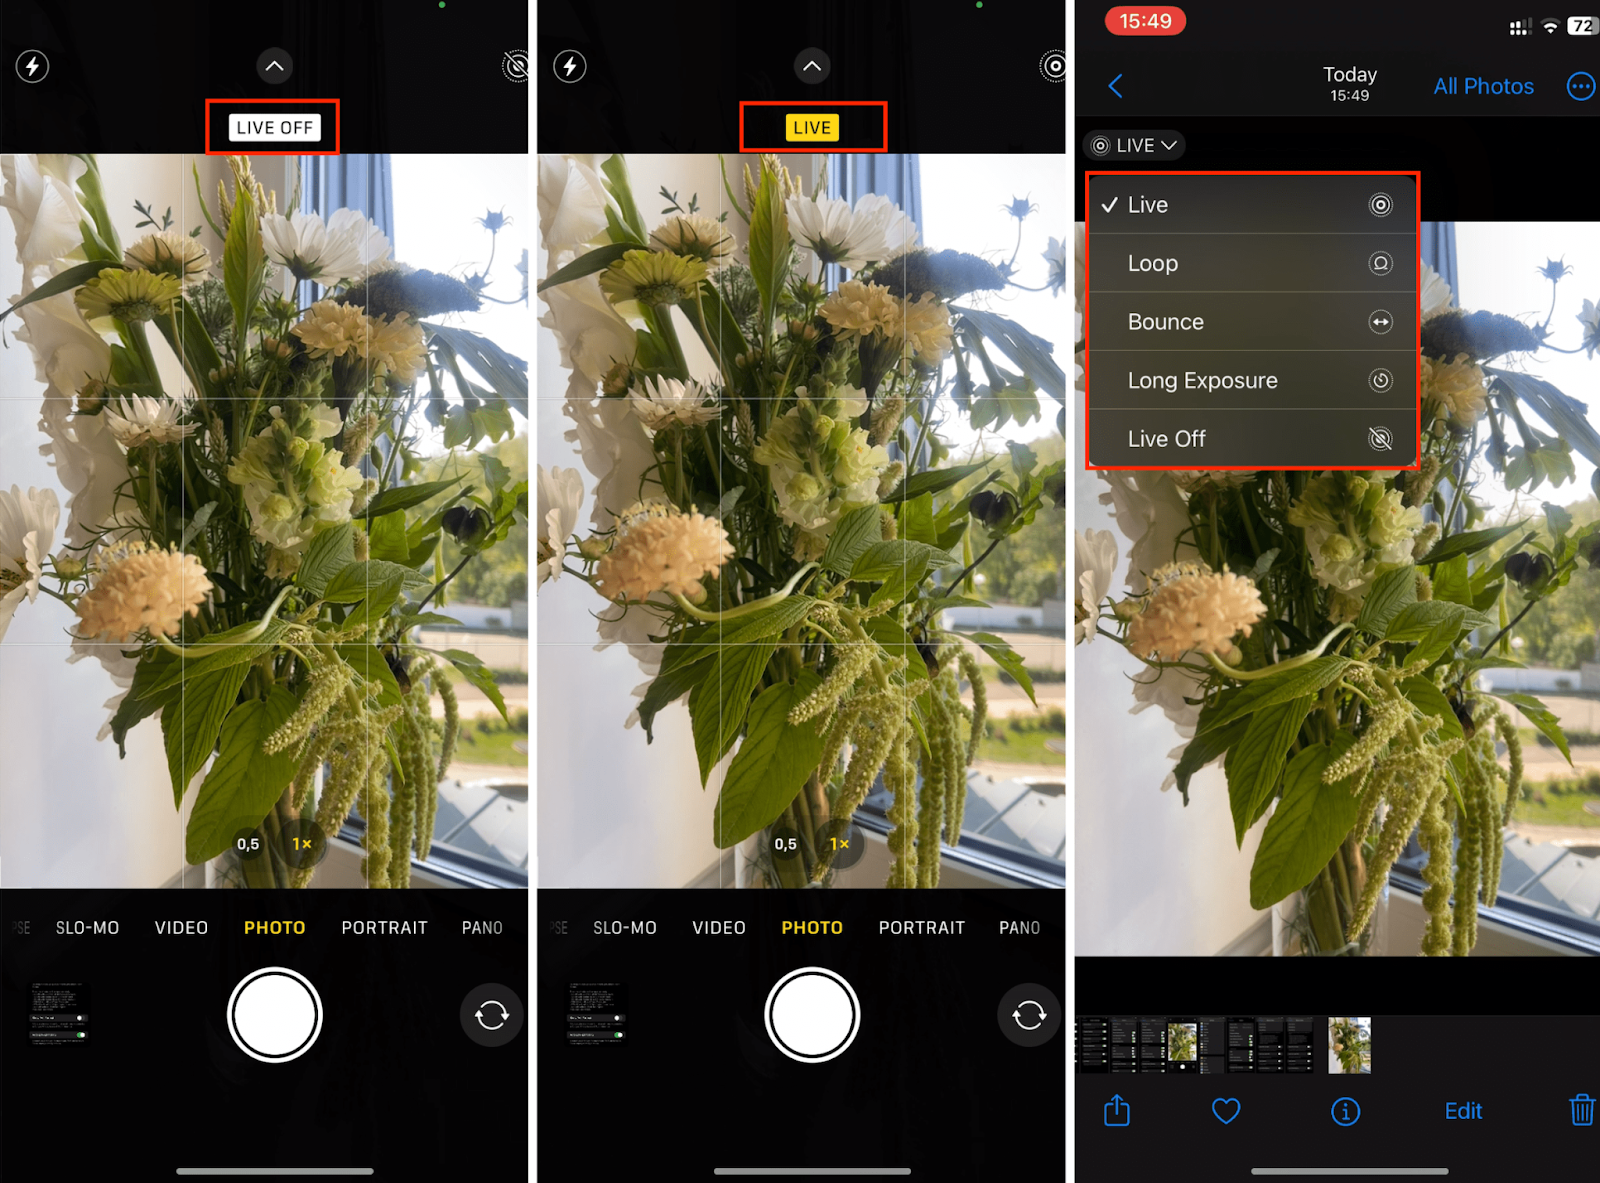
3-Second Video in Live Photo Mode Instead of a Regular Photo
Shooting in this mode gives you a three-second video instead of a static shot. Why? To bring the image to life and have more post-processing effects.
Go to the camera, tap the Live Photo mode (circle inside a circle at the top right), hold the phone steady, and tap the shutter. In the gallery, you can add effects: “Loop” (frames transition quickly and loop), “Bounce” (first the frames play in order, then in reverse, repeating), or “Long Exposure” (combines 45 frames into one picture).
If you want to learn more about enhancing your iPhone 11, 12, 13, 14, or 15 camera, including the Pro series, visit iSpace. We offer master classes and showcase the latest models to help you capture amazing content.
Always be aware!
Subscribe to the newsletter and be the first to know about new promotions and special offers