
Working with multiple apps is a common task for laptop users. But when you have to constantly switch between browser windows and documents, your attention gets scattered: you end up spending time navigating instead of working. macOS has built-in tools that let you place two apps side by side on a single screen and work with them simultaneously. Let’s take a look at how to split the screen on a MacBook and configure it.
The Benefits of Split-Screen Mode for Work and Study on a MacBook
When you’re writing code, preparing a presentation, or analyzing large amounts of data on a MacBook, you’ll want to expand your workspace. If your setup allows it, use a second display — an iPad works well for this. A simpler alternative is to open two apps side by side on a single screen in full-screen mode.
How Split View Works on Mac: Key System Features
Split View is a basic tool for organizing windows. It lets you arrange two apps side by side so you can avoid unnecessary clicks and stay focused. In addition, the system hides the Dock and the top menu bar. To set up your screen, follow these four steps:
- Hover your cursor over the green button in the upper-left corner of the active program and wait for the menu to appear.
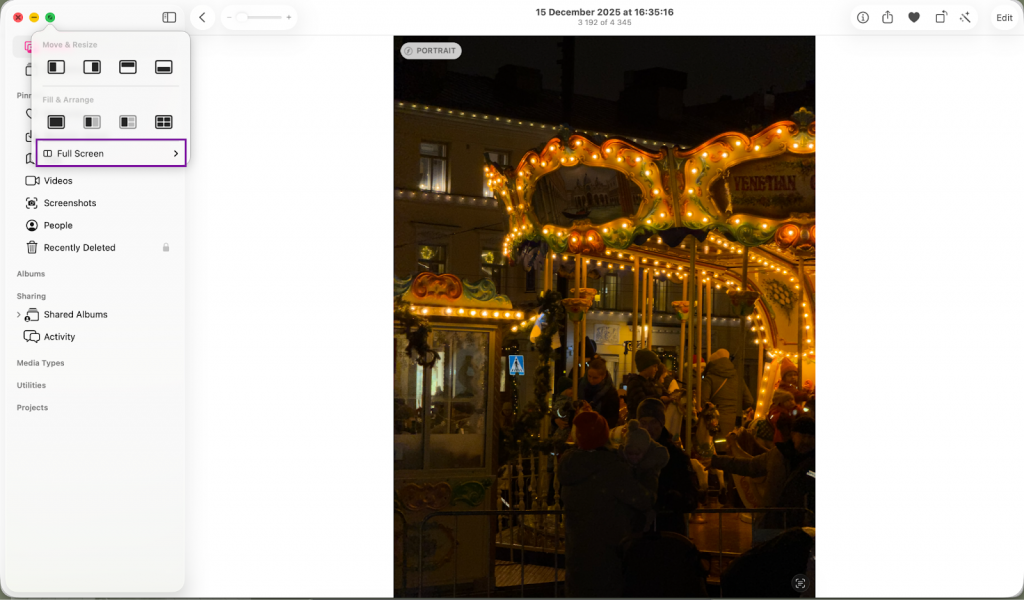
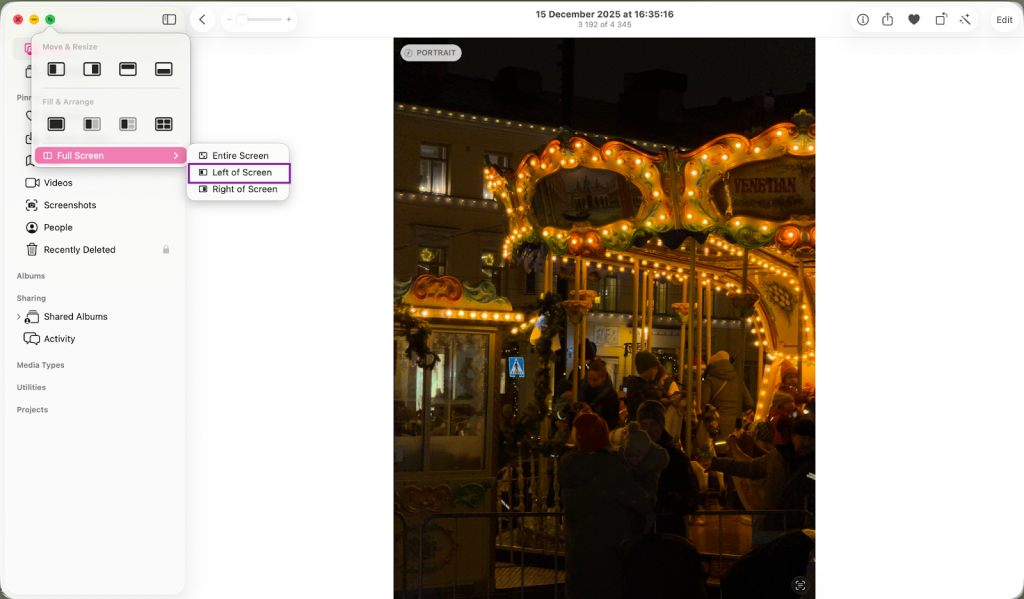
- In the window that appears, select “Align window to the left” or “Align window to the right.”
- The app will take up half the screen, and on the other half, the system will prompt you to select a second window from the list of open windows.
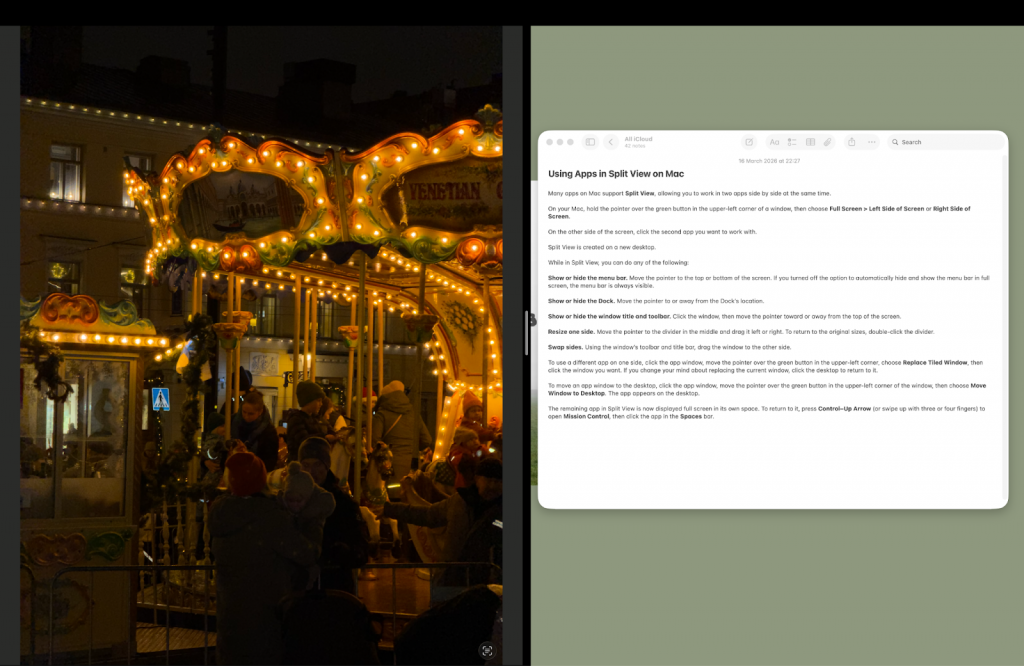
- Click on the desired program to finish the setup.
Apple devices feature high-quality displays: even on a 13.6-inch screen, minimized windows remain easy to read, making them comfortable to work with.
The interface is fairly simple and intuitive. If you need to move a section of text or an image, simply drag it with the mouse from one part of the screen to another.
Keyboard Shortcuts and Gestures for Window Management
You can streamline your workflow using keyboard shortcuts, these can be customized in System Preferences (under the “Keyboard” menu). Touch gestures are also available: swipe up with three (or four) fingers on the trackpad to open Mission Control, and swipe down to close it.
Adjusting Aspect Ratios and Additional Features
You don’t have to stick to a 1:1 split between windows, even though the system does this automatically. Hover your cursor over the black bar in the middle of the display and drag it to the side.

Full-screen mode hides everything else. But if you need to access the menu, just move the cursor to the top edge, and the interface will appear. To return to the normal view, press and hold the Esc key.
Practical Use Cases for Split View
The ability to display apps side by side is especially useful for work and study. We’ve compiled some ideas for these combinations:
- video calls — a conference call running on one side, with notes open on the other for taking notes;
- coding — the editor is active on the left, and the program’s output is displayed on the right;
- studying — a text document for an essay and the main source of information;
- design — a graphics editor and a reference guide.
If you have a monotonous job and your attention wanders easily, you can play your favorite movie on the other half — there are plenty of options.
Organizing Your Workspace with Mission Control
If two windows aren’t enough, Mission Control can help expand your options. You can create a separate virtual desktop (Spaces) for each group of tasks. For example, on one desktop you can edit photos, on another you can handle email and messaging, and on a third you can gather all your secondary apps. Swipe three fingers across the trackpad to open the tool, where you’ll see all open apps. To create a new desktop, simply click the “+” in the top-right corner.

To switch between workspaces in macOS, use trackpad gestures. Swipe left or right with three fingers, and the system will switch between screens displaying your open windows. To avoid confusion between workspaces, set different desktop backgrounds for each one.
Conclusion: How Split View Transforms Your Workflow
Effective screen organization is the cornerstone of success for today’s professionals. When you start splitting your screen and using apps strategically, you stop wasting energy on unnecessary movements and work more productively. A MacBook paired with a properly configured interface takes your efficiency to a whole new level.
You can find and test the right MacBook at iSpace stores. We are an official Apple Premium Partner in Georgia. Our experts will show you all the ins and outs of setting up your device and help you choose a new computer.
FAQ
Can I use three or more apps at the same time in Split View?
Split View is designed for two windows. To open more apps, use Mission Control and create additional workspaces.
How do I exit Split View on a MacBook?
Move the cursor to the top of the screen until a green button appears, then click it. The window will return to its normal size.
Can I change the width of windows while working?
Yes, simply drag the divider line between apps in the desired direction.
How do I quickly switch between pairs of apps on a MacBook?
Use a three-finger swipe gesture to the right or left on the trackpad to switch to another screen.
Check out more
Review Of MacBook Neo Powered By The A18 Pro Chip — Apple Power Accessible To Everyone
MacBook Air With the M5 Chip — A Major New Release of the Year
MacBook Pro With M5 Pro And M5 Max Chips: An Overview Of The 2026 Updates
Always be aware!
Subscribe to the newsletter and be the first to know about new promotions and special offers